Correcting output quality problems
The first step in correcting output quality problems is to determine if the image defect is present when copying and printing, or
only when copying. If the image defect is present only when copying, see
“Cleaning the ADF delivery system” on page 84
or
“Cleaning the scanner glass” on page 89
.
If the image defect is present only when printing, use the examples in the image defect table to determine which print quality
problem you are experiencing, then see the corresponding reference pages to troubleshoot.
Note
The examples below depict letter-size paper that has passed through the product long-edge first. (If the paper has
passed through the product short-edge first, lines and repeating defects will run ver tically rather than horizontally.)
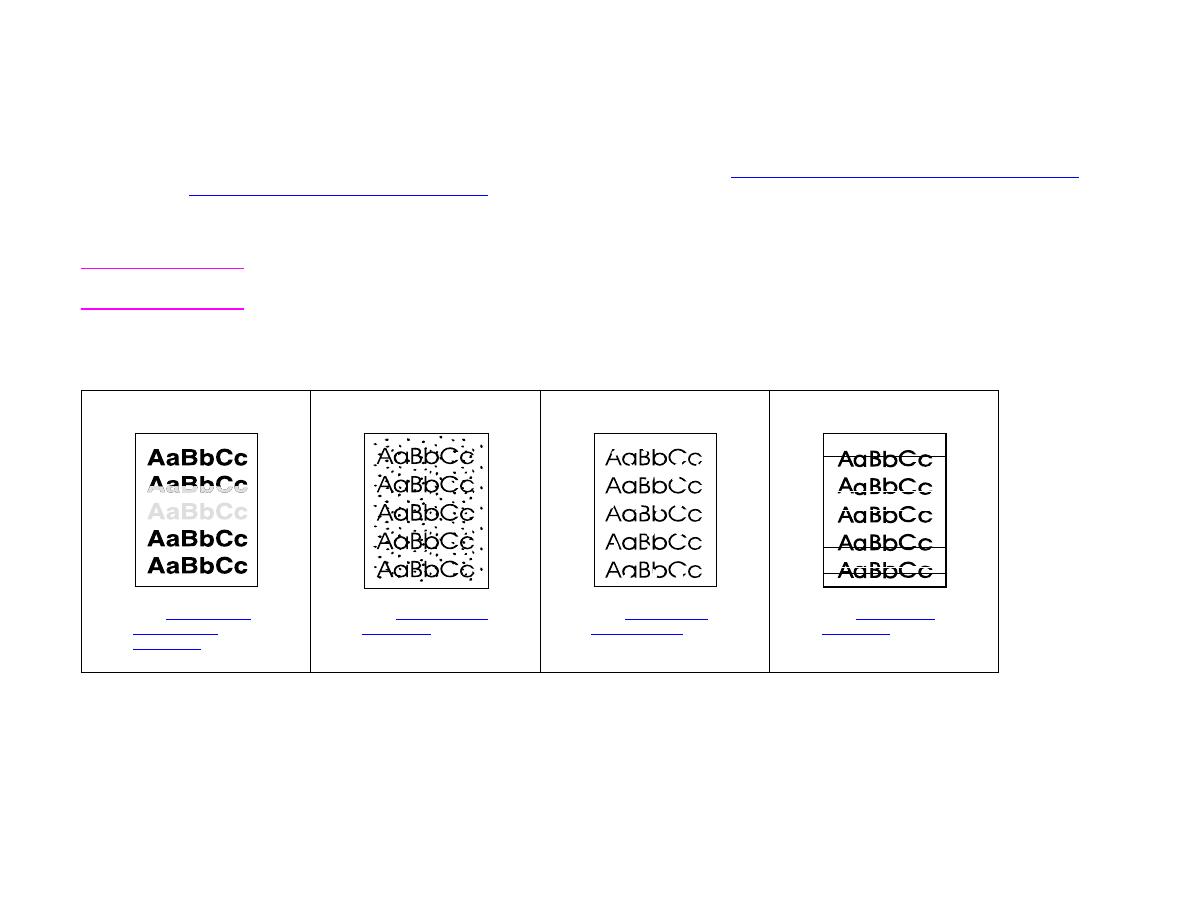
Image defect table
See
“Light print
or fade” on
page 140
See
“Specks” on
page 140
See
“Dropouts”
on page 140
See
“Lines” on
page 140
7 Problem solving
139
Correcting output quality problems
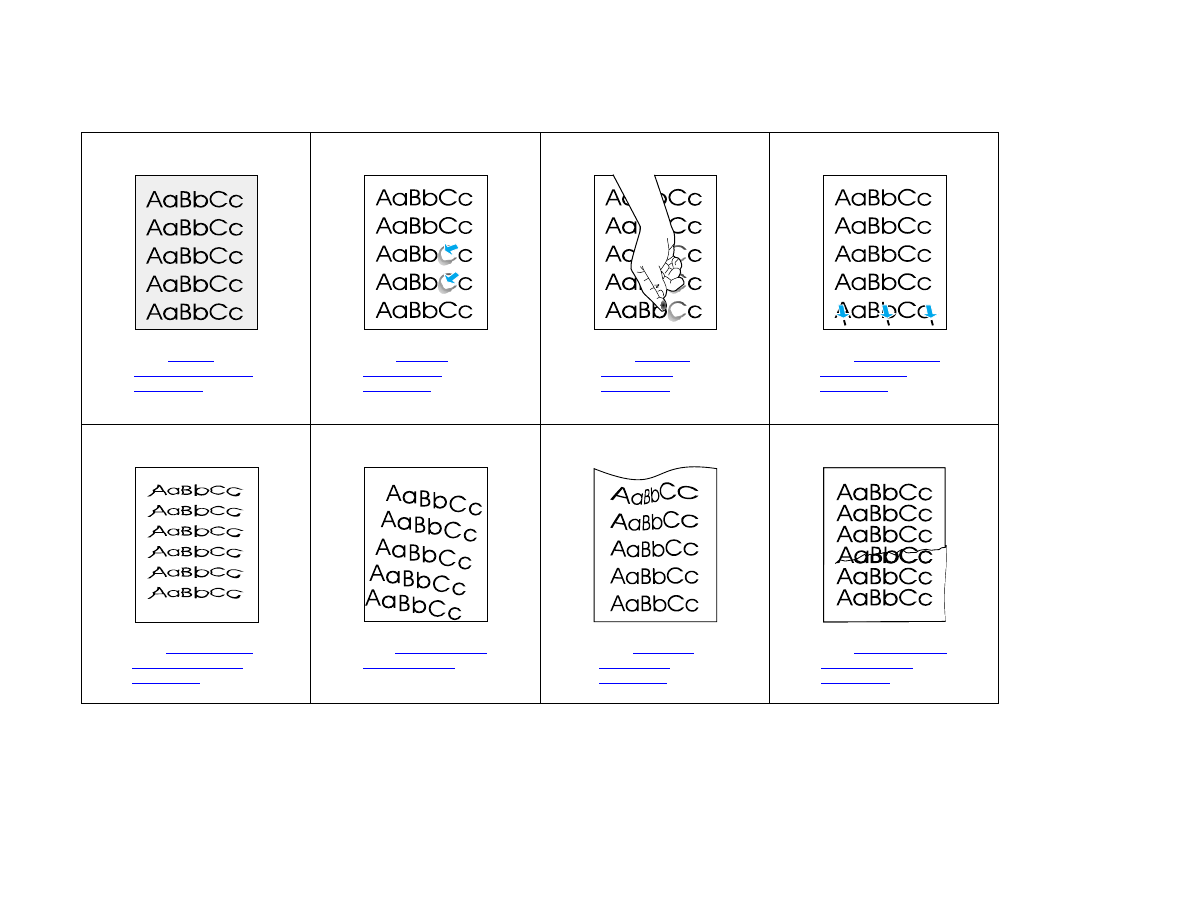
Image defect table
See
“Gray
background” on
page 141
See
“Toner
smear” on
page 141
See
“Loose
toner” on
page 141
See
“Repeating
defects” on
page 142
See
“Misformed
characters” on
page 142
See
“Page skew”
on page 142
See
“Curl or
wave” on
page 143
See
“Wrinkles or
creases” on
page 143

7 Problem solving
140
Correcting output quality problems
Light print or fade
z
The print cartridge might be low. Replace the print car tridge.
z
Maintenance might be due. Check this by printing a copy of the supplies status page (see
“Supplies status page” on
page 171
). If maintenance is due, order and install the printer maintenance kit. (See the introduce guide on the product
CD, or go to
www.hp.com/support/lj9000
.)
z
The print cartridge might be almost empty. Replace the print cartridge.
Specks
Specks might appear on a page after a jam has been cleared.
z
Print a few more pages to see if the problem corrects itself.
z
If specks occur frequently, set your product up to automatically run a cleaning page (see
“Using the product cleaning
page” on page 93
).
z
Clean the inside of the product (see the introduce guide on the product CD, or go to
www.hp.com/suppor t/lj9000
) and run
a manual cleaning page to clean the fuser (see
“Using the product cleaning page” on page 93
).
z
Try using a different type of paper.
z
Check for print car tridge leaks. If the print car tridge is leaking, replace it.
Dropouts
z
Make sure that the environmental specifications for the product are being met (see
“Environmental product stewardship
program” on page 238
).
z
If the paper is rough and the toner easily rubs off, either try changing the fuser mode to High 1 or High 2, or try using a
smoother paper.
z
Try using a different paper type.
Lines
z
Print a few more pages to see if the problem corrects itself.
z
Clean the inside of the product (see the introduce guide on the product CD, or go to
www.hp.com/suppor t/lj9000
) and run
a manual cleaning page to clean the fuser (see
“Using the product cleaning page” on page 93
).
z
Replace the print car tridge.

7 Problem solving
141
Correcting output quality problems
z
Maintenance might be due. Check this by printing a copy of the supplies status page (see
“Supplies status page” on
page 171
). If maintenance is due, order and install the printer maintenance kit. (See the introduce guide on the product
CD, or go to
www.hp.com/support/lj9000
.)
Gray background
z
Do not use paper that has already been run through the product.
z
Print a few more pages to see if the problem corrects itself.
z
Turn over the stack of paper in the tray. Also, try rotating the paper 180
degrees
.
z
At the product control panel, use the Print quality menu to decrease the toner density setting (see
“Print quality
submenu” on page 202
).
z
Make sure that the environmental specifications for the product are being met (see
“Environmental product stewardship
program” on page 238
).
z
Replace the print car tridge.
Toner smear
Also see
“Loose toner” on page 141
.
z
Print a few more pages to see if the problem corrects itself.
z
Try using a different type of paper.
z
Make sure that the environmental specifications for the product are being met (see
“Environmental product stewardship
program” on page 238
).
z
Clean the inside of the product (see the introduce guide on the product CD, or go to
www.hp.com/suppor t/lj9000
) and run
a manual cleaning page to clean the fuser (see
“Using the product cleaning page” on page 93
).
z
Maintenance might be due. Check this by printing a copy of the supplies status page (see
“Supplies status page” on
page 171
). If maintenance is due, order and install the printer maintenance kit. (See the introduce guide on the product
CD, or go to
www.hp.com/support/lj9000
.)
z
Replace the print car tridge.
Loose toner
Loose toner, in this context, is defined as toner that can be rubbed off the page.

7 Problem solving
142
Correcting output quality problems
z
If paper is heavy or rough, try using a high fuser mode so that toner fuses more completely onto the paper. At the control
panel, use
CONFIGURE FUSER MODE MENU
in the Paper handling menu (see
“Paper handling menu” on page 189
).
z
If you have observed a rougher texture on one side of your paper, try printing on the non-rough side.
z
Make sure that the environmental specifications for the product are being met (see
“Environmental product stewardship
program” on page 238
).
z
Make sure that paper type and quality meet HP specifications (see
“Specifications” on page 178
).
z
Maintenance might be due. Check this by printing a copy of the supplies status page (see
“Supplies status page” on
page 171
). If maintenance is due, order and install the printer maintenance kit. (See the introduce guide on the product
CD, or go to
www.hp.com/support/lj9000
.)
Repeating defects
z
Print a few more pages to see if the problem corrects itself.
z
If the distance between defects is 38 mm (1.5 in) or 94 mm (3.76 in), the print cartridge might need to be replaced.
z
Clean the inside of the product (see the introduce guide on the product CD, or go to
www.hp.com/suppor t/lj9000
) and run
a manual cleaning page to clean the fuser (see
“Using the product cleaning page” on page 93
).
z
Maintenance might be due. Check this by printing a copy of the supplies status page (see
“Supplies status page” on
page 171
). If maintenance is due, order and install the printer maintenance kit. (See the introduce guide on the product
CD, or go to
www.hp.com/support/lj9000
.)
Misformed characters
z
Print a few more pages to see if the problem corrects itself.
z
Make sure that the environmental specifications for the product are being met (see
“Environmental product stewardship
program” on page 238
).
z
Maintenance might be due. Check this by printing a copy of the supplies status page (see
“Supplies status page” on
page 171
). If maintenance is due, order and install the printer maintenance kit. (See the introduce guide on the product
CD, or go to
www.hp.com/support/lj9000
.)
Page skew
z
Print a few more pages to see if the problem corrects itself.
z
Verify that there are no torn pieces of paper inside the product.

7 Problem solving
143
Correcting output quality problems
z
Make sure that paper is loaded correctly, all adjustments have been made, and the paper is under the corner tabs (see
“Orienting media” on page 47
).
z
Turn over the stack of paper in the tray. Also, try rotating the paper 180
°
.
z
Make sure that paper type and quality meet HP specifications (see
“Specifications” on page 178
).
z
Make sure that the environmental specifications for the product are being met (see
“Environmental product stewardship
program” on page 238
).
Curl or wave
z
Turn over the stack of paper in the tray. Also, try rotating the paper 180
°
.
z
Make sure that paper type and quality meet HP specifications (see
“Specifications” on page 178
).
z
Make sure that the environmental specifications for the product are being met (see
“Environmental product stewardship
program” on page 238
).
z
Try printing to a different output bin.
z
If media is lightweight and smooth, try using a low fuser mode to reduce the heat in the fusing process. At the control
panel, use
CONFIGURE FUSER MODE MENU
on the Paper handling menu to do this (see
“Paper handling menu” on
page 189
).
Wrinkles or creases
z
Print a few more pages to see if the problem corrects itself.
z
Make sure that the environmental specifications for the product are being met (see
“Environmental product stewardship
program” on page 238
).
z
Turn over the stack of paper in the tray. Also, try rotating the paper 180
°
.
z
Make sure that paper is loaded correctly, all adjustments have been made, and the paper is under the corner tabs (see
“Orienting media” on page 47
).
z
Make sure that paper type and quality meet HP specifications (see
“Specifications” on page 178
).
z
If envelopes are creasing, try storing envelopes so that they lie flat.
7 Problem solving
144
Correcting output quality problems