
Software, computer, and product interface problems
Situation
Solution
A page fails to print.
Set
PRINT PS ERRORS=ON
, and then send the job again to print a PS error page. If this
does not identify the problem, try turning off Resource Saving and I/O Buffering or
try installing more memory (See
“PCL or PS font list” on page 173
).
A page prints with clipped
margins.
If the page margins are clipped, you might have to print the page at 300-dpi resolution
or install more memory. Also try turning off Resource Saving and I/O Buffering.
A PS error page prints.
z
Make sure the print job is a PS job.
z
Check to see whether your program expected you to send a setup or PS header
file to the product.
z
Check the product setup in your software application to make sure that the product
is selected.
z
Check cable connections to ensure that they are secure.
z
Reduce the complexity of the graphic.
z
Add available memory by turning on Resource Saving.
A text listing of PS commands
prints instead of your PS print job.
The control panel
PERSONALITY=AUTO
setting might have been confused by a
nonstandard PS code. Check the
PERSONALITY
setting to see if it is set to
PS
or
PCL
. If
it is set to
PCL
, set it to
PERSONALITY=AUTO
. If it is set to
AUTO
, set it to
PS
for this print
job only. When the job has printed, return the setting to
AUTO
.
Attempted to use a disk-resident
font, but the product substituted a
different font.
If you are using PCL, print the PCL Font Page, and verify that the font is on the disk.
If you are using PS, print the PS Font Page and make sure that the font is on the disk.
If the font is not on the disk, use the HP Resource Manager or the Macintosh-based
HP LaserJet utility to download the font.
7 Problem solving
150
Correcting output quality problems
Auto setup did not automatically
set up the product.
z
Set up the product manually by selecting Configure.
z
Select an alternate PPD (See
“Selecting an alternate PPD” on page 164
).
z
The PPD might have been renamed. If so, select the renamed PPD (See
“Selecting an alternate PPD” on page 164
).
z
A network queue might be present.
Blank pages print.
z
Turn the product off and then back on.
z
Make sure the print cartridge is installed properly.
Cannot access Tray 2 or 3, or
Tray 4.
Make sure that the paper tray guides are adjusted correctly for the paper size you are
using. (See the introduce guide on the product CD, or go to
www.hp.com/suppor t/lj9000
.)
Cannot clear
MANUALLY FEED
[TYPE] [SIZE]
message.
z
A previous print job might still be in the product buffer.
z
Make sure that Tray 1 has the correct paper size loaded. (See the introduce guide
on the product CD, or go to
www.hp.com/suppor t/lj9000
.)
Computer software problem.
Check that your computer is working correctly by printing from a program you know
works, or by printing a plain text file to see if the problem is with your program or with
your driver. (For example,
C:\dir>LPTn
where
n
is the number of the computer port
the product is connected to, for example LPT1.) To print the page, you might have to
send a form feed command from your computer.
Situation
Solution
7 Problem solving
151
Correcting output quality problems
Connection cannot be established
or seems to take longer than
usual.
z
Use a device that is IRDA-compliant; look for an IRDA symbol on the device, or
see the computer user guide for IRDA specifications.
z
Make sure that the operating system on your computer includes a FIR driver and
that your program uses a compatible driver. (Note that complex pages take longer
to print.)
z
Position the HP Fast InfraRed Receiver within the range of operation described in
“Printing a job using FIR” on page 80
, and make sure that no object is blocking the
connection. (This object could be a hand, paper, books, or even bright light.)
z
Make sure that the two IR ports are clean (free from dir t and grease).
z
Make sure that no bright light is shining directly into either IR port. Bright light of
any kind (sunlight, incandescent light, fluorescent light, or light from an infrared
remote control, such as those used for TVs and VCRs) shining directly into one of
the IR ports might cause interference.
z
Position the portable device closer to the FIR port on the product.
Control panel settings, such as
RESOLUTION
or
ORIENTATION
, do
not work or are ignored.
Software commands override control panel settings (See
“Using control panel menus”
on page 251
for information about how your program works with control panel
settings).
Data from a previous print job is
still in the product buffer.
z
Make sure that you are using the correct driver.
z
A complex print job might still be processing.
z
Make sure the product is not paused. Make sure the control panel reads
PROCESSING JOB
. If the product is paused, press
S
TAR T
to resume printing.
z
Pull out the print cartridge and check for paper. Reseat the print cartridge.
z
Open Trays 2 and 3. Make sure that the appropriate paper is inserted. (See the
introduce guide on the product CD, or go to
www.hp.com/support/lj9000
.) Close
the trays.
Situation
Solution
7 Problem solving
152
Correcting output quality problems
Data is missing, but there are no
product messages.
z
Check your software application to be sure the print file contains no errors.
z
Check your cable to make sure it is securely connected to both the product and
the computer.
z
Your parallel cable might be defective. Use a high-quality cable. (See the introduce
guide on the product CD, or go to
www.hp.com/suppor t/lj9000
for an HP cable par t
number.)
z
Check your network connection.
Data light is flashing, but nothing
prints.
z
Make sure that you are using the correct driver.
z
A complex print job might still be processing.
z
Make sure the product is not paused. Make sure the control panel reads
PROCESSING JOB
.
z
Pull out the print cartridge and check for paper. Reseat the print cartridge.
z
Open Trays 2 and 3. Make sure that the appropriate paper is loaded. (See the
introduce guide on the product CD, or go to
www.hp.com/support/lj9000
.) Close
the trays.
Disk failure
EIO x DISK
NOT FUNCTIONING
Turn the product off and make sure that the EIO hard disk is inser ted correctly and is
securely fastened. If the control panel message continues to be displayed, the EIO
hard disk needs to be replaced.
Disk is not initialized
DISK x NOT
INITIALIZED
Use the Windows-based HP Resource Manager or the Macintosh-based HP LaserJet
Utility to initialize the disk.
Disk is write-protected
DISK IS
WRITE PROTECTED
Fonts and forms cannot be stored on the disk when the disk is write-protected. Use
the Windows-based HP Resource Manager or the Macintosh-based HP LaserJet
Utility to remove the write protection from the disk.
Situation
Solution

7 Problem solving
153
Correcting output quality problems
Driver might not be set up to print
on both sides of the paper.
Make sure that the option to print on both sides of the paper is properly configured in
the driver.
Duplex printing accessory jams.
Make sure that you are using the suppor ted paper weights and sizes. (See the
introduce guide on the product CD, or go to
www.hp.com/suppor t/lj9000
.)
FIR port status indicator does not
light up.
z
Make sure that the product is in
READY
mode and that the FIR por t you are printing
from is IRDA-compliant and within the range of operation described in
“Printing a
job using FIR” on page 80
.
z
Make sure that the HP Fast InfraRed receiver is properly connected to the product.
z
Run the product Self Test. Make sure that FIR POD (IRDA Compliant) is printed
under Installed Personalities and Options.
First page takes much longer to
print than following pages.
z
Make sure that the product displays
READY
.
z
Set the PowerSave feature for a longer time period (See
“Configuration page” on
page 169
). If a page takes longer to print due to complex formatting commands,
changing the PowerSave setting might not improve print speed. You might want to
simplify the page.
Garbled pages print, there are
overprints, or only a portion of a
page prints.
z
Make sure that your program is configured for the correct printer.
z
Replace the interface (I/O) cable with a cable you know works to see if the cable is
defective.
z
Your parallel cable might be defective. Use a high-quality cable. (See the introduce
guide on the product CD, or go to
www.hp.com/suppor t/lj9000
for an HP cable par t
number.)
z
Set the
PERSONALITY
item in the Configuration menu to
AUTO
(See
“PERSONALITY=AUTO” on page 206
). The product might have been set to PCL,
and a PS job was sent to the product, or vice versa.
z
Data sent to the product might be corrupt. Try sending another file to see if it
prints.
Situation
Solution
7 Problem solving
154
Correcting output quality problems
General operation problems.
For general paper operation information, see
“Printing” on page 46
.
General repeated stapler jam
problems.
z
Check to see that the job to be stapled is less than five mm (.08 inch) thick.
z
Stapler might have some trapped staple wires that are obstructing the magazine.
Remove loose staples and paper dust from the inside of the stapler (See
“To clear
a staple jam from the stapler/stacker” on page 109
).
Job has been properly sent, but
the product will not print.
If the connection is broken before the entire print job has been transmitted to the
product (printing has not yet started), the product might not print any of the job. Press
S
TOP
to clear the product memory. Then, reposition the por table device within the
range of operation described in
“Printing a job using FIR” on page 80
, and print the
job again.
Job has incorrect fonts.
z
If you are printing an .EPS file, try downloading the fonts contained in the .EPS file
to the printer before printing. Use the HP LaserJet Utility (See
“Software for
Macintosh computers” on page 19
).
z
If the document is not printing with New York, Geneva, or Monaco fonts, go into
the Page Setup dialog box, and select Options to deselect substituted fonts.
Job is not sent to the desired
printer.
Another printer with the same or similar name might have received the print job. Make
sure that the printer name matches the name selected in the Chooser (See
“Selecting an alternate PPD” on page 164
).
Situation
Solution

7 Problem solving
155
Correcting output quality problems
Job prints in Courier (the product
default font) instead of the font
you requested.
z
The requested typeface is not available in the product or is not present on the
disk. Use a font download utility to download the required font.
z
Fonts downloaded to memory are lost when the product is turned off. They are
also lost if Resource Saving is not used, and a personality switch is performed to
print a PCL job. Disk fonts are not affected by PCL jobs or by turning the product
off.
z
Print a PS Font Page to verify that the font is available. If a disk font appears to be
missing, it might be because a software utility was used to delete the font,
because the disk was reinitialized, or because the disk drive is not installed
correctly. Print a configuration page to verify that the disk drive is installed and is
functioning correctly.
z
Print a Disk Directory to help identify available fonts.
Job prints on the wrong side of the
paper.
z
Make sure you have loaded the paper correctly. (See the introduce guide on the
product CD, or go to
www.hp.com/suppor t/lj9000
.)
z
If you are printing one-sided copies, load paper into Tray 1 with the side to be
printed facing up. Load paper in Trays 2, 3, and Tray 4 with the side to be printed
facing down.
z
If you are printing two-sided copies, load paper into Tray 1 with the first side to be
printed facing down. Load paper in Trays 2, 3, and Tray 4 with the first side to be
printed facing up.
Job was not duplexed.
z
Print a configuration page to ensure that the duplex printing accessory is installed
properly (See
“Configuration page” on page 169
).
z
Make sure the duplex printing accessory has been configured in the driver.
z
Make sure that the software is not overriding the driver setting.
Situation
Solution
7 Problem solving
156
Correcting output quality problems
Job was not stapled.
Jobs sent to the stapler might not be stapled for one or more of the following reasons:
z
One-page jobs will not be stapled.
z
The stapler is out of staples and
AUTO CONTINUE
is set to
ON
.
z
The wrong size or type of paper was used for the job.
z
More than 50 pages were sent to the stapler, exceeding its capacity.
z
The stapler has bent or broken staples in the stapler head.
z
A staple jam was recently cleared (up to two sequential jobs might not be stapled).
z
The job was sent to a bin other than the stapler bin because the wrong size or type
of paper was used for the job.
z
The interface cable to the stapler unit might be defective or not connected
properly.
Job went to a different location
than was expected.
The wrong size or type of paper was used for the job. (See the introduce guide on the
product CD, or go to
www.hp.com/support/lj9000
.)
Last page did not print and the
Data light is on.
z
Make sure that you are using the correct driver.
z
Complex print job might still be processing.
z
Product might be waiting for the end of a file that did not come with the job. Touch
Continue to send it.
z
Make sure the product is not paused. Make sure the control panel reads
PROCESSING JOB
.
z
Pull out the print cartridge and check for paper. Reseat the print cartridge.
z
Open Trays 2 and 3. Make sure that the appropriate paper is loaded. (See the
introduce guide on the product CD, or go to
www.hp.com/support/lj9000
.) Close
the trays.
Situation
Solution
7 Problem solving
157
Correcting output quality problems
LOAD TRAY x
[TYPE] [SIZE]
paper size
message
Load the requested paper size, or touch Continue to print on a size already loaded.
The product has a job in the buffer and is waiting to print on the correct paper size.
Set the paper type in the control panel (See
“Control panel menus” on page 185
).
Network or shared printer
problems.
Check for network or shared printer problems by connecting your computer directly to
the product and printing from a program you know works. If you suspect network
problems, check with your system administrator or consult the network documentation
that came with your network cards.
Tray 4 will not work.
The power cord is not firmly plugged in to both the product and the power receptacle.
Remove and reconnect the power cord.
Paper is loaded into Tray 1, and
the control panel displays a load
or manual feed message.
Load the correct paper in the tray. (See the introduce guide on the product CD, or go
to
www.hp.com/support/lj9000
.) If the correct paper is already loaded, touch
Continue.
Paper is not going to the correct
output location.
z
Verify that the correct output bin is selected in the driver. For more information
about changing driver settings, see the online help.
z
The paper does not meet the specifications for the output bin (See the introduce
guide on the product CD, or go to
www.hp.com/support/lj9000
).
Paper jams and paper-feeding
problems.
z
See
“To clear jams in Trays 2 and 3” on page 99
or
“To clear jams in Tray 4” on
page 100
.
z
Ensure that paper specifications are within recommended range. (See the
introduce guide on the product CD, or go to
www.hp.com/support/lj9000
.)
z
Make sure the paper guides are adjusted properly and are not skewed. (See the
introduce guide on the product CD, or go to
www.hp.com/support/lj9000
.)
z
Perform preventive maintenance if requested by the product.
Situation
Solution
7 Problem solving
158
Correcting output quality problems
Paper size adjustment and
installation.
See the introduce guide on the product CD, or go to
www.hp.com/suppor t/lj9000
.
Product does not recognize the
duplex printing accessory.
z
Print a configuration page to ensure that the duplex printing accessory is installed
properly (See
“Configuration page” on page 169
).
z
Turn the product off. Remove and reinstall the unit. Turn the product on.
z
Make sure that the duplex printing accessory has been configured in the driver.
Product does not recognize the
hard disk.
Turn the product off and verify that the hard disk is inserted correctly and is securely
fastened.
Product does not recognize
Tray 4.
z
Make sure you selected Tray 4 in the driver (See
“Helpful software for increased
flexibility” on page 14
).
z
Turn the product off and then back on.
z
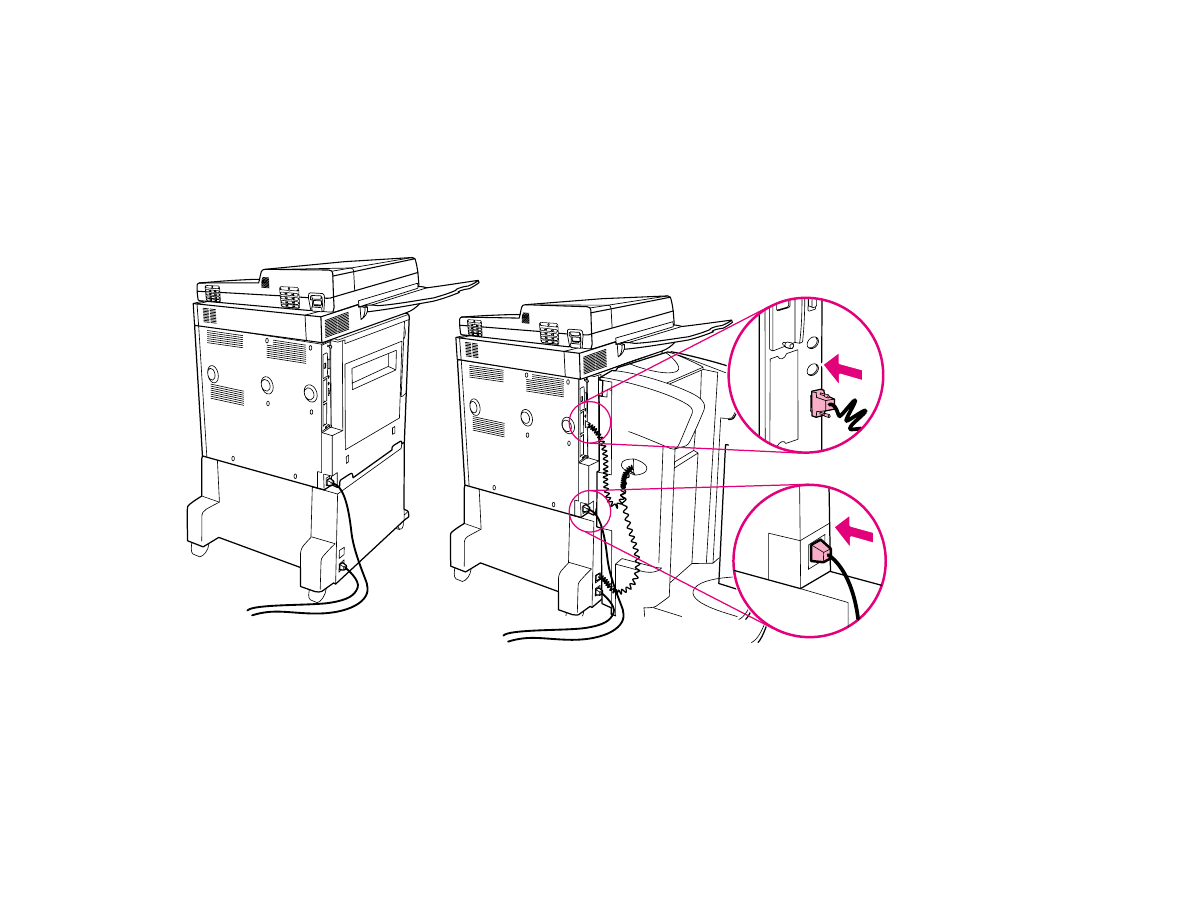
Make sure the power cord is plugged into Tray 4 (See
“Cabling configurations” on
page 163
).
z
If the product still does not recognize Tray 4, contact your dealer or authorized
HP service provider.
Product does not recognize
stapler.
Check the cable to the stapler. Make sure it is properly connected at both ends (See
“Cabling configurations” on page 163
).
Situation
Solution

7 Problem solving
159
Correcting output quality problems
Product draws paper from the
wrong tray.
z
Be sure your program is selecting the correct paper size or type.
z
Make sure that the driver for your program is correctly installed, configured, and
capable of requesting the required paper size and type.
z
The size of paper requested is not loaded in the tray selected. The product draws
paper from the next default tray that contains the correct size. Load the correct
paper in the tray and make sure the tray is adjusted correctly. Load the tray with
enough paper to complete the print job.
z
If you selected Tray 2, 3, or Tray 4 and did not turn the product off when installing
it, the product does not recognize it and draws paper from the next default tray
source. Turn the product off, then back on, and the product will recognize the tray.
Product interface problems.
Print a configuration page from the control panel to verify that the interface
configurations shown on the printout match those on the host computer (See
“Configuration page” on page 169
).
Product is paused.
Press
S
TAR T
. The control panel should display
READY
and the Ready light should be
lit. Resume printing.
Product is off or not connected to
an active power source.
Make sure that all power cables are firmly plugged in to both the product components
and an active power source. Make sure the product is on.
Product is ready, but not receiving
data (the Data light does not
blink).
z
Check for loose I/O cable connections at the product and computer or network
port.
z
Try your I/O cable on a system that you know works.
z
Check that the correct interface cable was selected and is securely connected to
both the product and the computer. If the cable is not correctly configured, see the
star t guide for configuration information.
z
If connected to a network, print a Jetdirect configuration page to check for
interface or network problems (See
“Configuration page” on page 169
).
Situation
Solution
7 Problem solving
160
Correcting output quality problems
Product is usually slow to
respond.
z
Product speed is highly dependent on how your software application is set up,
which driver you are using, and how much traffic is on the network. See the star t
guide for configuration information.
z
You might need to add more memory (See
“Installing memory” on page 220
).
Product port problem.
Check that your computer port is configured and working properly. One way to check
this is to connect another product to that por t on your computer and print from a
program you know works.
Product prints only part of a page
or document.
The connection has been broken during transmission. If you move the por table device
during transmission, the connection can be broken. IRDA-compliant devices are
designed to recover from temporary connection interruptions. You have up to 40
seconds to reestablish the connection (depending on the portable device being used).
Product prints wrong fonts or
formats.
z
The font is not present in the product and must be downloaded from your program,
or the proper font DIMM must be installed. Check your program to make sure the
correct driver has been installed and configured. To verify that the font you want is
available, print a PS or PCL font list (See
“Information menu” on page 188
).
z
Your software selected a substitute font for one that is not available in the product.
(See your software program manual for more information about font selection.)
Situation
Solution
7 Problem solving
161
Correcting output quality problems
Printing stops in the middle of the
job.
z
Check the control panel display for an error message.
z
If you are on a network, make sure the computer is correctly configured and that
there is not a network problem (see your system administrator).
z
Check the line voltage to make sure that it is steady and within product
specifications. (See the introduce guide on the product CD, or go to
www.hp.com/support/lj9000
.) Turn the product off and then back on.
z
Check the time-out setting in your network application. You might need to increase
it.
z
If you are trying to copy a file to the product from the DOS prompt, use the copy
command
COPY [filename] LPTn /B
printer port, such as LPT1 (where
n
is
the port number).
Note
To output the page, you might have to send a form feed command from the computer.
PS print job will not print.
Check the configuration in the PostScript tab of Windows. Check that Protocol is set
to AppleTalk and that Binary Data is not selected.
Software is selecting the wrong
port.
Check your operating system port settings to be sure the print job is being sent to the
correct por t (for example, LPT1).
The control panel and driver are
not set to the same paper size.
Make sure that the custom paper size defined from the control panel and the custom
paper size defined in the driver are the same.
The file you are trying to print
might not have the option to print
on both sides of the paper turned
on.
Make sure that the option to print on both sides of the paper is configured in the
driver.
The FIR status indicator turns off
during transmission.
The connection might have been broken. Press
S
TOP
to clear the product memory.
Then, reposition the portable device within the range of operation described in
“Printing a job using FIR” on page 80
, and print the job again.
Situation
Solution

7 Problem solving
162
Correcting output quality problems
The Macintosh computer is not
communicating with the product.
z
Make sure the control panel displays
READY
.
z
Make sure the correct driver is selected in the left half of the Chooser. Then make
sure that the required product name is selected (highlighted) on the right half of
the Chooser. There will be an icon next to the product name after the driver has
been set up and configured with the PPD.
z
If the product resides on a network with multiple zones, make sure the correct
zone is selected in the AppleTalk Zones box in the Chooser.
z
Make sure the correct product has been selected in the Chooser by printing a
configuration page (See
“Configuration page” on page 169
). Make sure the name
of the product displayed on the configuration page matches the product in the
Chooser.
z
Make sure AppleTalk is active. (Select this in the Chooser or in the AppleTalk
control panel, whichever is applicable for your OS version.)
z
Make sure the computer and product are on the same network. From Control
Panels in the Apple menu, select the Network (or the AppleTalk) control panel
and then choose the correct network (for example, LocalTalk or EtherTalk).
The driver icon does not appear in
the Chooser.
Make sure the Apple LaserWriter 8 Chooser extension resides in the Extensions
folder. If it is not present anywhere on your system, you can obtain the driver from
your Macintosh OS system software CD, from Apple Computer, Inc., or see the
introduce guide on the product CD, or go to
www.hp.com/suppor t/lj9000
.
Type has been specified as labels,
transparencies, or envelopes.
z
Make sure that the media type can be printed on both sides. (See the introduce
guide on the product CD, or go to
www.hp.com/support/lj9000
.)
z
Change the media type to the proper media type for printing on both sides.
Situation
Solution
7 Problem solving
163
Correcting output quality problems